System upgrade can be performed when the software needs to be updated or system failures occur.
The existing user data should be backed up before the system upgrade. Note that the mechanical home
position is not included for user data backup. Thus, take a photo or screenshot of the mechanical home
position page before the system upgrade.
The detailed upgrade procedure is as follows:
1. Prepare a USB flash disk and copy the system upgrade file “firmware.bin” to its root directory.
2. Insert the USB flash disk into the USB port of the controller or the collaborative robot cabinet.
3. Go to System -> Save to USB -> User Data Backup to back up the user data.
4. Go to System -> System Upgrade then press “OK” button and wait several minutes. The system
will check the firmware and be upgraded automatically. It will restart the system after successful
upgrade, as shown in Figure 1-1 .
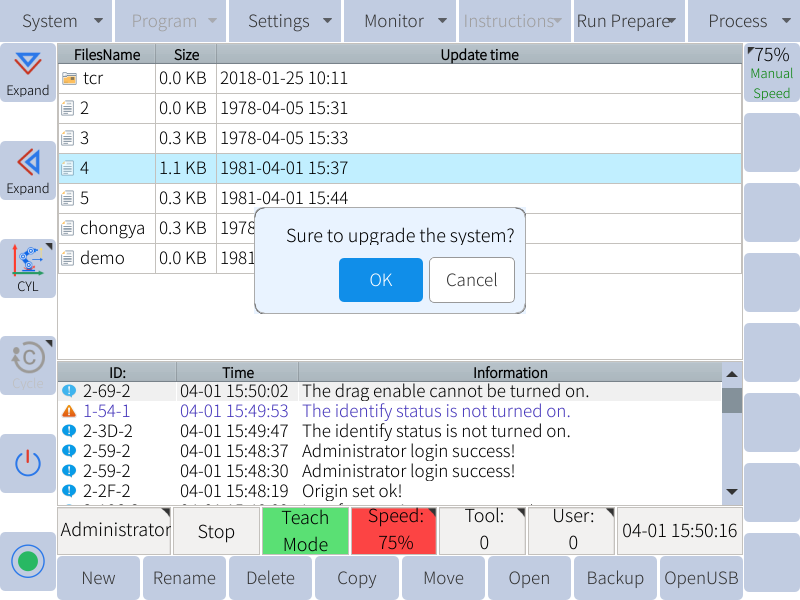
Figure 1-1
After the software is upgraded and restarted, please reconfirm whether the zero
position of the robot is normal.
The firmware upgrade is peculiar to the collaborative robot and the detailed upgrade procedures are
as follows:
1. In the root directory of the USB flash disk, create a new folder named “rbctrl” and copy the
firmware upgrade file into it.
2. Insert the USB flash disk into the USB port of the collaborative robot cabinet, and a USB device
icon will be displayed in the coordinate area of the programming pendant screen.
3. Go to “System > System Upgrade”, and a dialog box with the message “Confirm System Upgrade”
will pop up. After pressing “OK” button, the system will give the message “Please
select the content that needs to be upgraded”. Then select “Upgrade Firmware”, as shown in
Figure 1-2 .

4. Press “OK” button, and the Figure 13-3 displays.
Figure 1-3 : Upgrade successfully
For the robot EC612, select:
The file “j32_xxxxxxxx.bin” for Axis 1 and Axis 2.
The file “j25_xxxxxxxx.bin” for Axis 3.
The file “j17_xxxxxxxx.bin” for Axis 4, Axis 5 and Axis 6.
Press “Save” button every time the upgrade file is selected for an
For the robot EC66, select:
The file “j25_xxxxxxxx.bin” for Axis 1 and Axis 2.
The file “j20_xxxxxxxx.bin” for Axis 3.
The file “j14_xxxxxxxx.bin” for Axis 4, Axis 5 and Axis 6.
For the robot EC63, select:
The file “j20_xxxxxxxx.bin” for Axis 1 and Axis 2.
The file “j20_xxxxxxxx.bin” for Axis 3.
The file “j14_xxxxxxxx.bin” for Axis 4, Axis 5 and Axis 6.
Press “Save” button every time the upgrade file is selected for an axis until the upgrade for all axes are
finished. Power off and restart after completing the upgrade.
After the system software is updated, the system PLC is also automatically upgraded, but only supports
the A23 board.
For the A22 board, before the software upgrade, you need to navigate to System -> Save to USB ->
PLC backup for backup. After the upgrade is completed, navigate to System -> Load from USB ->
PLC Update to import PLC.
To update the PLC version, acquire the plc.dat file from the ELITE Robot website or forum. Navigate
to System -> Load from USB -> PLC Update.
Select “System PLC” from the list and click on “OK”.
The PLC upgrade must be performed after the software upgrade.